
 Pin it
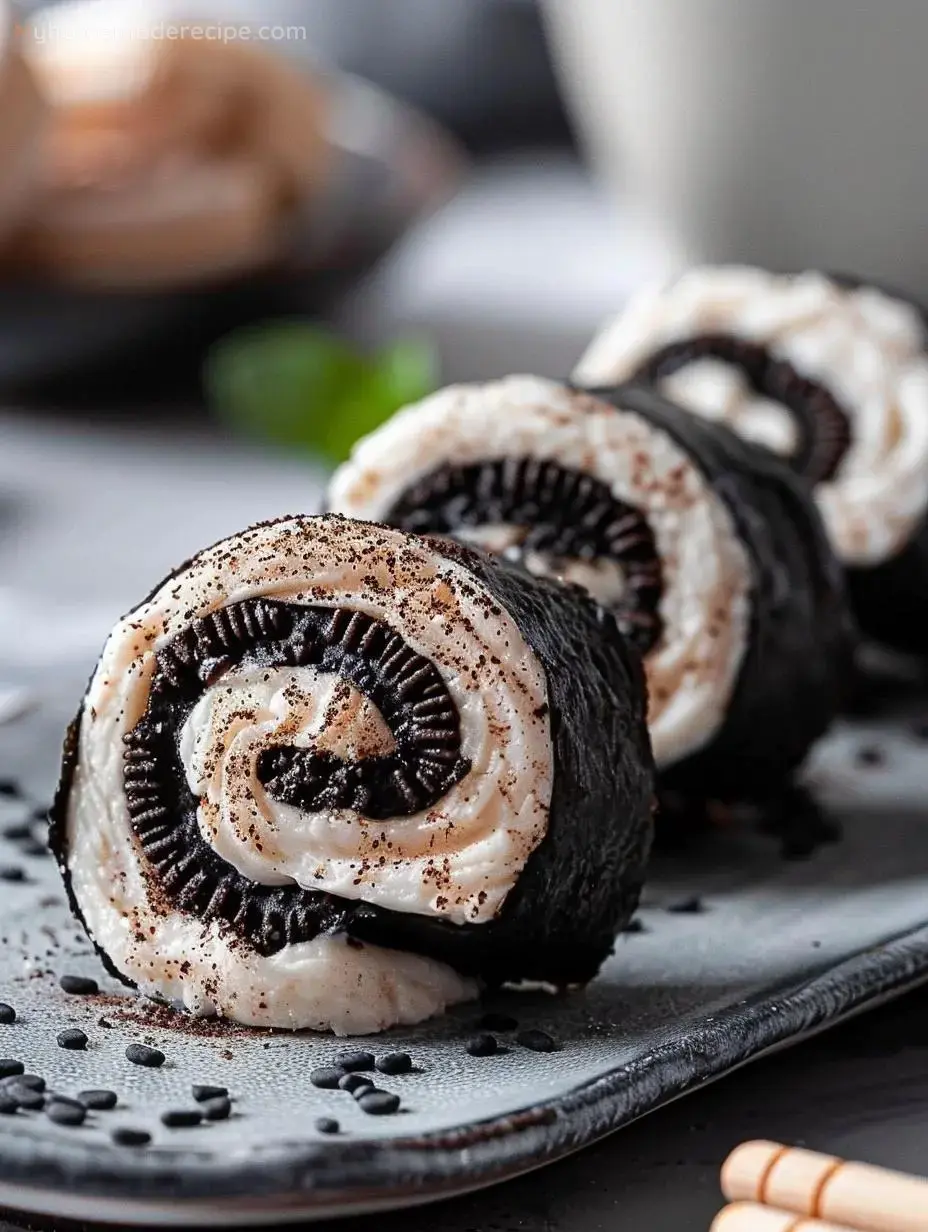
Looking for a unique and fun treat that's sure to be a hit at your next party? Look no further than our 2-Ingredient Oreo Sushi recipe! This delightful snack is not only incredibly easy to make but also combines the beloved flavors of Oreos with a creative twist. Perfect for kids and adults alike, Oreo Sushi is a playful way to enjoy your favorite cookies in a whole new form. With just Oreos and milk, you can create a delicious and visually appealing treat that’s perfect for any occasion. Let's dive into the details and get started on making this fun and tasty dessert!
Ingredients
For this simple yet ingenious recipe, you will need just two main ingredients. Here’s a detailed look at what you’ll need to make our 2-Ingredient Oreo Sushi:
- 24 Oreos (one package): These iconic cookies are the base of our recipe. You'll need to separate the cookies from their cream filling for this recipe.
- 1/4 cup milk: Milk is used to help bind the Oreo crumbs together, forming a dough-like consistency that's easy to roll out and shape.
The beauty of this recipe lies in its simplicity. With just Oreos and milk, you can create a sweet treat that looks impressive and tastes delicious. Whether you’re making these for a party, a family gathering, or just as a fun snack, they’re sure to be a hit!
Instructions
Follow these detailed steps to create your very own Oreo Sushi:
Prepare the Oreo Dough
Start by separating the Oreo cookies from their cream filling. Place the Oreo cookies (without the cream) in a food processor and blitz until they become fine crumbs. Next, add 3 tablespoons of milk to the food processor and blend until the mixture forms a ball of dough. The milk helps to bind the crumbs together, creating a dough-like consistency that's easy to work with.
Shape the Dough
Lay a sheet of plastic wrap on a flat surface. Place the Oreo dough on the plastic wrap and press it into a rough square shape. Use a rolling pin to roll the dough into an even layer about 1/4 inch thick. Trim the edges to create a perfect square. This step ensures that your sushi rolls will be uniform and easy to handle.
Prepare the Filling
In a small bowl, mix the Oreo cream filling with 2 teaspoons of milk until smooth and creamy. This mixture will be used to fill your sushi rolls, adding a delicious and sweet contrast to the Oreo dough.
Assemble the Sushi
Evenly spread the creamy filling over the rolled-out Oreo dough. Starting from one end, roll up the dough tightly into a log, using the plastic wrap to help you roll it smoothly. Make sure the roll is tight and compact to ensure clean slices later on.
Chill and Serve
Optional: Wrap the roll in plastic wrap and refrigerate it for about 30 minutes to firm it up. This step makes it easier to slice the roll into pieces. Once chilled, unwrap the roll and use a sharp knife to slice it into sushi-sized pieces. Arrange the pieces on a serving plate and enjoy!
Serving and Storage Tips
Now that your Oreo Sushi is ready, here are some tips on how to serve and store this delightful treat:
- Serve the Oreo Sushi on a decorative platter to make it even more appealing.
- Drizzle some chocolate sauce or a dusting of powdered sugar over the sushi pieces for an extra touch of sweetness and presentation.
- If you're serving this at a party, consider pairing it with a bowl of fresh fruit or a scoop of ice cream for a complete dessert experience.
If you have any leftovers, store them in an airtight container in the refrigerator. The Oreo Sushi can be kept fresh for up to 3 days. For a firmer texture, you can also freeze the sushi rolls. Wrap them tightly in plastic wrap and store in a freezer-safe container. To serve, let them thaw in the refrigerator for a few hours before slicing.