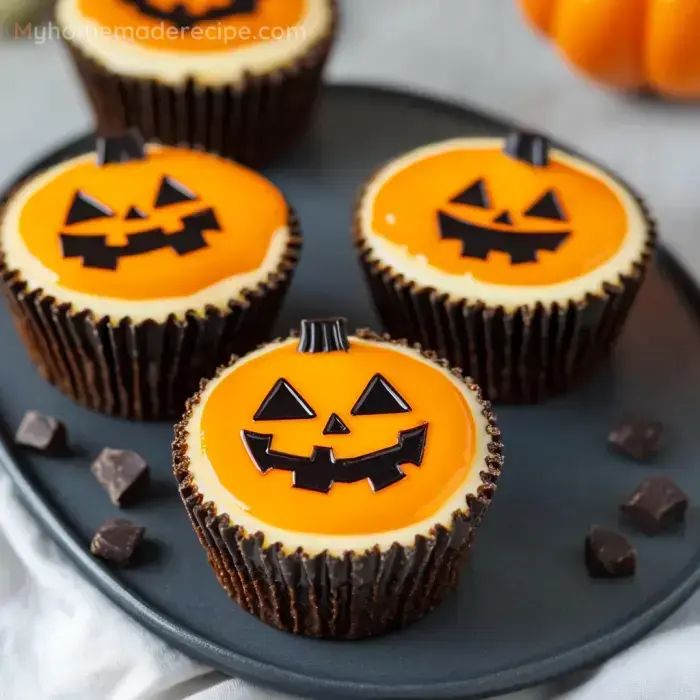
These Mini Halloween Cheesecakes are a delightful treat for your spooky celebrations. Starting with a crispy Oreo cookie crust, they're layered with creamy cheesecake filling in yellow, orange, and white to mimic candy corn. The cheesecakes are baked to perfection and topped with fluffy whipped cream. For added festive flair, they're decorated with cute ghost figurines and candy corn. These bite-sized desserts are not only visually appealing but also incredibly tasty. They're perfect for Halloween parties, fall gatherings, or as a fun baking project with kids. The recipe is straightforward, allowing you to create impressive, professional-looking treats at home. With their creamy texture and festive appearance, these mini cheesecakes are sure to be a hit with both children and adults alike.

Halloween Cheesecake Jack-o-Lanters
Halloween cheesecake jack-o-lanters | Myhomemaderecipe.com

As a mom who's been running a cooking website for years, I've whipped up my fair share of spooky treats. But let me tell you, these Halloween Cheesecake Jack-o-Lanterns are something special. They're the perfect blend of creamy indulgence and festive fun, guaranteed to make your Halloween gathering a hit. I've been perfecting this recipe for years, tweaking it each season to get it just right. So, grab your apron, and let's dive into the world of these delightfully eerie desserts!

Halloween has always been a magical time in our household. The crisp autumn air, the rustling of fallen leaves, and the excited chatter of children planning their costumes – it all comes together to create a truly enchanting atmosphere. And what better way to celebrate than with a dessert that captures the very essence of the holiday? These Halloween Cheesecake Jack-o-Lanterns do just that, combining the rich, velvety texture of cheesecake with the whimsical charm of jack-o'-lanterns.

Now, you might be wondering, "Why cheesecake jack-o'-lanterns?" Well, let me tell you, as a busy mom, I'm always looking for ways to make holiday preparations easier without sacrificing the fun. Traditional pumpkin carving can be messy and time-consuming, not to mention the pumpkins start to wilt after a few days. These cheesecake versions, on the other hand, are not only delicious but can be made ahead of time and stored in the fridge. Plus, they're a fantastic way to get the kids involved in the kitchen – my little ones always have a blast helping to decorate these spooky treats!

A Ghostly Gathering of Ingredients

Before we start our baking adventure, let's round up our ingredients. For the crust, you'll need:

  • 2 cups of graham cracker crumbs
  • 1/4 cup of granulated sugar
  • 1/2 cup of melted unsalted butter

For the creamy cheesecake filling, gather:

  • 4 (8 oz) packages of cream cheese, softened
  • 1 cup of granulated sugar
  • 4 large eggs
  • 1/4 cup of heavy cream
  • 1 tablespoon of vanilla extract
  • Orange food coloring

And for the spooky decorations:

  • Black gel food coloring or black icing
  • Piping bags and tips

As for tools, you'll need a 9-inch springform pan, mixing bowls, an electric mixer, and a few spatulas. Don't forget to preheat your oven to 325°F (165°C) – we want it nice and toasty for our jack-o'-lanterns!

Crafting the Crust

Let's start with the foundation of our spooky creation – the crust. In a medium bowl, mix together the graham cracker crumbs and sugar. Slowly pour in the melted butter, stirring until the mixture resembles wet sand. Press this mixture firmly into the bottom of your springform pan, creating an even layer. Pop it in the fridge to chill while we work on the filling.

I remember the first time I made this crust with my daughter. She was so excited to crush the graham crackers, and we ended up with more crumbs on the floor than in the bowl! But that's part of the fun, isn't it? These little kitchen mishaps are what make cooking with family so memorable.

Conjuring the Cheesecake Filling

Now for the star of the show – the cheesecake filling. In a large bowl, beat the softened cream cheese until it's smooth and creamy. Gradually add the sugar, mixing until it's well combined. Next, add the eggs one at a time, making sure each is fully incorporated before adding the next. Finally, mix in the heavy cream and vanilla extract.

Here's where the magic happens – add a few drops of orange food coloring to give your cheesecake that perfect pumpkin hue. Start with a little and gradually add more until you achieve the desired shade. Remember, you can always add more, but you can't take it away!

Pour this bewitching mixture over your chilled crust, smoothing the top with a spatula. Give the pan a gentle tap on the counter to release any air bubbles. Now, it's time for the oven!

Baking Your Jack-o'-Lantern Base

Place your cheesecake in the preheated oven and bake for about 1 hour to 1 hour and 15 minutes. You'll know it's done when the edges are set, but the center still has a slight jiggle. Turn off the oven and crack the door open, letting the cheesecake cool slowly for about an hour. This gradual cooling helps prevent cracks – we want our jack-o'-lanterns to have smooth, unblemished faces!

Once it's cooled in the oven, remove the cheesecake and let it come to room temperature. Then, pop it in the fridge for at least 4 hours, or overnight if you can resist the temptation!

Bringing Your Jack-o'-Lanterns to Life

Now comes the fun part – decorating! Carefully remove the cheesecake from the springform pan and place it on a serving platter. Using black gel food coloring or black icing in a piping bag, start creating your jack-o'-lantern faces.

This is where you can let your creativity shine. Try different expressions – a classic triangle-eyed grin, a surprised open mouth, or even a winking face. My kids love to come up with the most outrageous designs, and we always end up laughing at our creations.

If you're feeling extra creative, you can use green icing to add a stem at the top of your cheesecake. You could even pipe on some vines or leaves for added detail. Remember, there's no right or wrong way to decorate your jack-o'-lantern – the quirkier, the better!

Spooky Variations to Try

Once you've mastered the basic recipe, why not experiment with some variations? Here are a few ideas I've tried over the years:

  • Pumpkin Spice Cheesecake: Add 1 teaspoon of pumpkin pie spice to your filling for an extra autumnal flavor.
  • Chocolate Swirl: Before baking, swirl some melted chocolate through the orange filling for a marbled effect.
  • Candy Corn Topping: Sprinkle some candy corn around the edges of your cheesecake for a colorful finish.
  • Mini Jack-o'-Lanterns: Use a muffin tin to create individual-sized cheesecakes – perfect for parties!

Serving Your Spooky Creation

When it's time to serve your Halloween Cheesecake Jack-o-Lanterns, make sure you have a sharp knife and a glass of hot water handy. Dip the knife in hot water and wipe it clean between each cut to ensure clean, neat slices.

These cheesecakes are best served chilled, so take them out of the fridge about 15 minutes before you plan to serve. This allows the flavors to develop fully without the cheesecake becoming too soft.

If you have any leftovers (which, in my experience, is rare!), they can be stored in an airtight container in the fridge for up to 5 days. Just be sure to cover the cut edges with plastic wrap to prevent them from drying out.

A Word on Food Safety

As a mom, I always prioritize food safety, especially when cooking for kids. Make sure all your ingredients are fresh and your utensils are clean. If you're serving these at a Halloween party, remember that cheesecake shouldn't sit out at room temperature for more than 2 hours.

Also, be mindful of any allergies your guests might have. Cheesecake contains dairy and eggs, which are common allergens. If you're catering to someone with allergies, consider making a vegan version using dairy-free cream cheese and an egg replacer.

Creating Memories in the Kitchen

Making these Halloween Cheesecake Jack-o-Lanterns has become a cherished tradition in our family. It's not just about the delicious end result (though that's certainly a bonus!), but about the time spent together in the kitchen. The laughter as we come up with silly jack-o'-lantern faces, the pride in my children's eyes as they help mix the ingredients, and the joy of sharing our creation with friends and family – these are the moments that make this recipe truly special.

So this Halloween, why not start a new tradition of your own? Gather your little ghouls and goblins in the kitchen and create some spooky, delicious memories. Who knows? You might just find that making Halloween Cheesecake Jack-o-Lanterns becomes your family's favorite part of the holiday!

Remember, cooking should be fun, so don't stress if your cheesecake isn't perfect. Each quirk and imperfection adds character to your jack-o'-lanterns, making them uniquely yours. So put on your favorite Halloween playlist, don those aprons, and let's get baking! Happy Halloween, everyone!

A Sweet End to a Spooky Night

As the jack-o'-lanterns flicker on porches and costumed trick-or-treaters make their rounds, there's something comforting about knowing you have a special treat waiting at home. These Halloween Cheesecake Jack-o-Lanterns are more than just a dessert – they're a celebration of the season, a canvas for creativity, and a delicious way to bring family and friends together.

So whether you're hosting a haunted house party, preparing for a family gathering, or just want to add a touch of whimsy to your Halloween night, give these cheesecake jack-o'-lanterns a try. I promise you, the memories you'll create in the process are just as sweet as the cheesecake itself. Here's to a Halloween filled with laughter, love, and lots of creamy, pumpkin-faced delights!