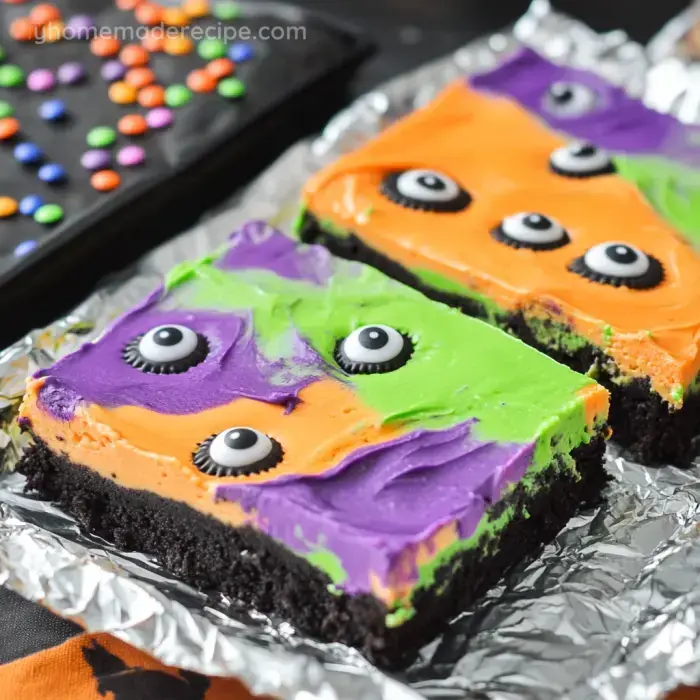
Monster Mash Halloween Cheesecake Bars

These Monster Mash Halloween Cheesecake Bars are a ghoulishly good treat perfect for your Halloween festivities. The recipe starts with a crisp chocolate cookie crust, followed by a layer of rich, creamy cheesecake. The fun really begins with the decorating - using colorful frosting, candy eyes, and various sprinkles to create adorable monster faces on top. Each bar is unique, allowing for creativity in design. The contrast between the smooth cheesecake and the crunchy toppings adds an interesting texture. These bars are not only visually appealing but also delicious, combining the classic flavors of cheesecake with playful Halloween elements. They're ideal for parties, school events, or as a special treat for trick-or-treaters. The recipe is straightforward, making it a fun project to involve kids in the kitchen during the Halloween season.

Featured in Sweet treats for any occasion.

A woman in an apron is preparing a meal in a sunny kitchen filled with fresh vegetables and herbs.
Updated on Sat, 04 Jan 2025 13:18:38 GMT
Monster Mash Halloween Cheesecake Bars Save it
Monster Mash Halloween Cheesecake Bars | myhomemaderecipe.com
I just love Halloween! There's something magical about the crisp autumn air, the colorful leaves, and the excitement of costumes and treats. As a mom and long-time food blogger, I'm always on the lookout for fun and spooky recipes to make with my kids. This year, I stumbled upon the most adorable idea for Monster Mash Halloween Cheesecake Bars, and I couldn't wait to share it with you all! The inspiration for these delightful treats came from a four-pack of gel food coloring I found with perfect Halloween colors. I thought, "Why not create a festive cheesecake that incorporates all these spooky hues?" And thus, the Monster Mash Halloween Cheesecake Bars were born! These colorful, creamy bars are sure to be a hit at any Halloween party or gathering. Now, let me walk you through how to make these scrumptious treats. Don't worry if you're not a baking expert – I'll guide you through each step with all the tips and tricks I've learned over the years.

Gather Your Ingredients

  • 32 OREO cookies
  • 6 tablespoons of butter

For the cheesecake filling, gather:

  • 24 oz cream cheese, softened
  • 3 eggs
  • 1 1/2 cups white sugar
  • 1 1/2 teaspoons vanilla
  • 1/4 cup flour
  • 1/4 cup sour cream
  • Green, orange, purple, and black gel food coloring

And for the fun decorations:

  • Confetti sprinkles in orange, green, and purple
  • Candy eyes in assorted sizes

Preparing the Spooky Crust

Let's start by making our deliciously dark OREO crust. Preheat your oven to 325°F (165°C). Now, it's time to crush those cookies! I like to use a food processor to get nice, fine crumbs, but you can also put them in a zip-top bag and crush them with a rolling pin. It's a great way to let the kids help and work out some energy! Once your OREOs are crushed (filling and all), melt 6 tablespoons of butter and mix it into the cookie crumbs. The mixture should look like wet sand. Line a 9x13 inch baking pan with foil, making sure to leave some overhang – this will make it super easy to lift the cheesecake out later. Press the OREO mixture firmly into the bottom of the pan. I find using the bottom of a measuring cup helps to get a nice, even layer. Pop this in the oven for about 10 minutes, then set it aside to cool while we work on the filling.

Whipping Up the Colorful Cheesecake Filling

Now for the fun part – the rainbow of cheesecake colors! First, make sure your cream cheese is nice and soft. Cold cream cheese can lead to lumpy batter, and we want our monsters to be smooth and creamy. Cream together the sugar and softened cream cheese until it's silky smooth. Next, add in your eggs one at a time, mixing well after each addition. Then, mix in the vanilla, sour cream, and flour until everything is well combined. The batter should be smooth and glossy at this point.
Here comes the magical transformation! Divide your batter into four separate bowls. Now, let's bring our monsters to life with color. Add a few drops of green gel food coloring to one bowl, orange to another, purple to the third, and black to the last. Mix each one well, adding more color if needed to get that perfect Halloween hue.

Creating the Monster Mash

Time to assemble our colorful creation! Spoon each color of the batter onto different sections of the cooled crust. Don't worry about being too precise – we want this to look a bit chaotic and fun. Once all the colors are in, take a knife or a skewer and gently swirl where the colors meet. This creates a cool marbled effect that looks just like a monster mash!
Now, here's a pro tip I've learned over the years: To prevent your cheesecake from cracking, we're going to use a water bath. Place a large baking sheet filled halfway with water on the bottom rack of your oven. This creates a humid environment that helps the cheesecake bake evenly. Carefully place your cheesecake pan on the middle rack, right above the water bath. Bake for about 45 minutes without opening the oven door. After 45 minutes, check if the center is still jiggly. If it is, keep checking every 2-3 minutes until it's set but still has a slight wobble.

Cooling and Decorating Your Monster Masterpiece

Once your cheesecake is baked to perfection, it's time for the hardest part – waiting! Let it cool on the counter for about an hour, then pop it in the fridge for at least 6 hours, or overnight if you can resist that long. When you're ready to decorate, take the cheesecake out of the fridge and let it sit on the counter for about an hour. This makes it easier to cut and decorate. Now, let's bring our monsters to life! Sprinkle your confetti sprinkles over each colored section. Then, use a tube of frosting or a dab of melted chocolate to stick on pairs of candy eyes all over the cheesecake. You can make some monsters with lots of eyes, some with just two – let your imagination run wild!

Slicing and Serving Your Spooky Treats

When it's time to serve, use the foil overhang to carefully lift the cheesecake out of the pan. For clean cuts, run a sharp knife under hot water, wipe it dry, then slice. Repeat this process for each cut to avoid dragging crumbs through your beautiful creation.

Tips and Tricks for Perfect Monster Mash Bars

  • Make sure all your ingredients are at room temperature before starting. This helps everything mix together smoothly.
  • Don't overmix the batter once you've added the eggs. Too much mixing can lead to a cracked cheesecake.
  • If you're short on time, you can use a pre-made OREO crust. But trust me, homemade is worth the extra effort!
  • Feel free to experiment with different food coloring combinations. You could do a blue and white "frozen" theme for winter, or pink and red for Valentine's Day.
  • If you're not a fan of OREOs, graham crackers make a great alternative for the crust.

Spreading the Halloween Cheer

These Monster Mash Halloween Cheesecake Bars have become a tradition in our house. My kids look forward to making them every year, and they're always a hit at school parties and neighborhood gatherings. There's something so satisfying about seeing people's faces light up when they see (and taste) these colorful, creamy treats. Halloween is such a special time of year. It's a chance for us to let our imaginations run wild, to dress up and pretend, and to indulge in some sweet treats. As a mom, I love creating these memories with my kids, and I hope this recipe helps you create some special memories with your loved ones too.

A Hauntingly Delicious Tradition

As we wrap up this monstrously delicious adventure, I hope you're feeling inspired to create your own batch of Monster Mash Halloween Cheesecake Bars. They're more than just a dessert – they're a fun activity, a creative outlet, and a way to bring people together. From my kitchen to yours, I wish you a Halloween filled with laughter, love, and lots of yummy treats. Happy baking, and don't forget to let your inner monster out when you're creating these spooky delights! Remember, the kitchen is a place for experimentation and fun. Don't be afraid to put your own spin on these bars. Maybe you'll create a new Halloween tradition of your own! And if you do make these Monster Mash Halloween Cheesecake Bars, I'd love to hear how they turned out. Happy Halloween, everyone!

Halloween Desserts

Create a spooktacular dessert with these creamy Monster Mash Halloween Cheesecake Bars, featuring a festive twist on classic cheesecake.

Prep Time
20 Minutes
Cook Time
40 Minutes
Total Time
60 Minutes
By: Zaho

Category: Desserts

Difficulty: Intermediate

Cuisine: American

Yield: 24 Servings (24 bars)

Dietary: Vegetarian

Ingredients

01 1 package (15.25 oz) chocolate cake mix.
02 1/2 cup unsalted butter, melted.
03 1 large egg.
04 2 packages (8 oz each) cream cheese, softened.
05 1 cup granulated sugar.
06 2 large eggs.
07 1 teaspoon vanilla extract.
08 1/2 cup sour cream.
09 1/2 cup Halloween-colored M&M's.
10 1/2 cup chocolate chips.
11 Halloween sprinkles for decoration.

Instructions

Step 01

Preheat oven to 350°F (175°C). Line a 9x13-inch baking pan with parchment paper.

Step 02

In a large bowl, mix together the chocolate cake mix, melted butter, and 1 egg until well combined.

Step 03

Press the mixture evenly into the prepared baking pan to form the crust.

Step 04

In another bowl, beat cream cheese and sugar until smooth. Add 2 eggs and vanilla extract, mixing well.

Step 05

Fold in the sour cream until just combined.

Step 06

Pour the cheesecake mixture over the crust.

Step 07

Sprinkle M&M's and chocolate chips evenly over the top.

Step 08

Add Halloween sprinkles for decoration.

Step 09

Bake for 35-40 minutes, or until the center is almost set.

Step 10

Allow to cool completely, then refrigerate for at least 2 hours before cutting into bars.

Notes

  1. These bars are perfect for Halloween parties or fall gatherings.
  2. Can be made a day ahead and stored in the refrigerator.
  3. For a spookier look, use orange and black M&M's and sprinkles.

Nutrition Facts (Per Serving)

It is important to consider this information as approximate and not to use it as definitive health advice.
  • Calories: 280
  • Total Fat: 15 g
  • Total Carbohydrate: 35 g
  • Protein: 4 g