
 Pin it
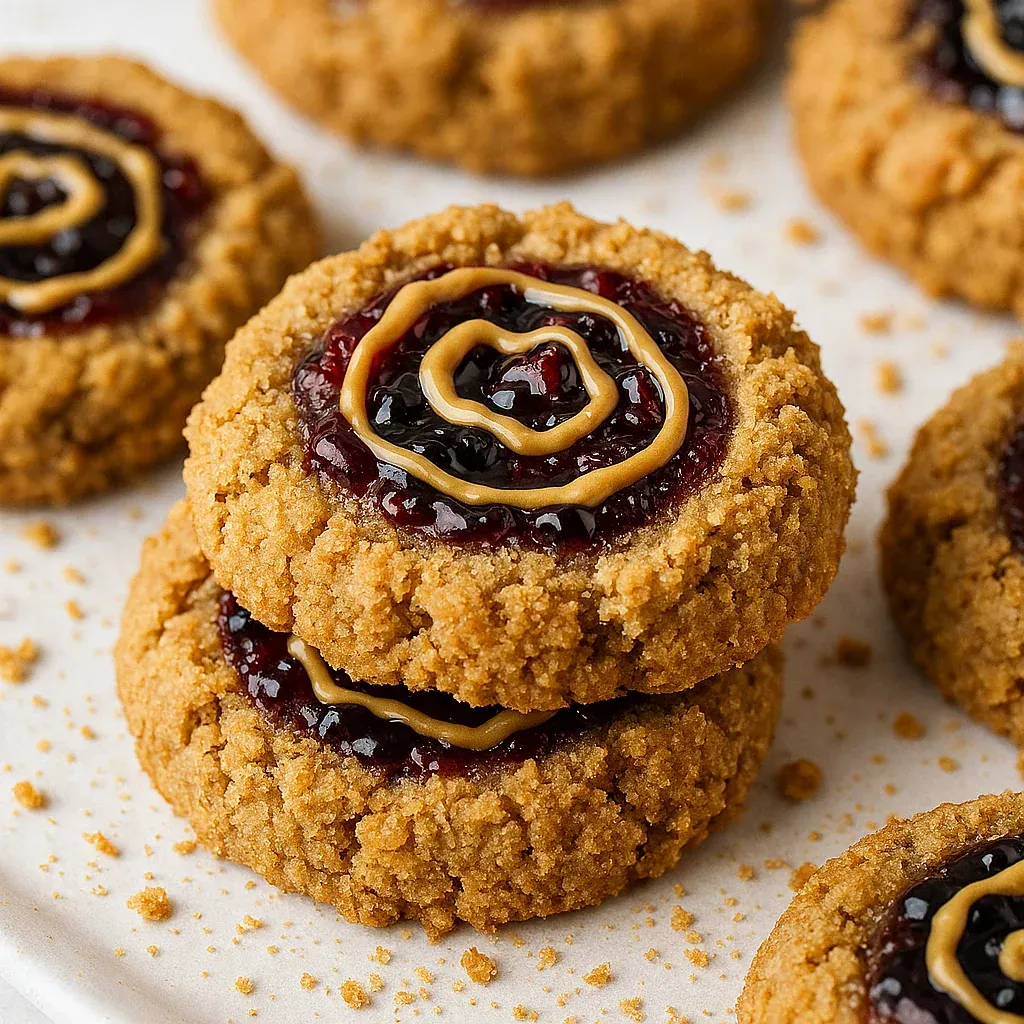
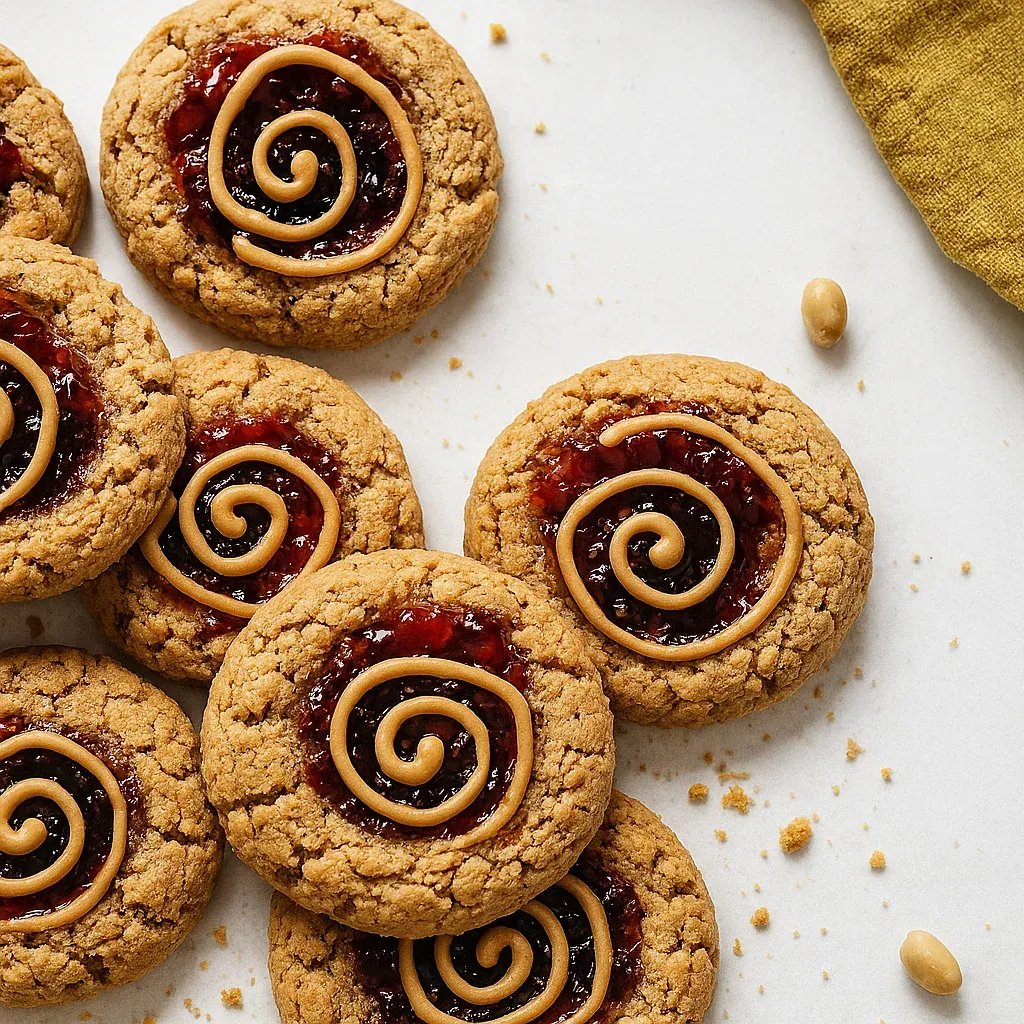
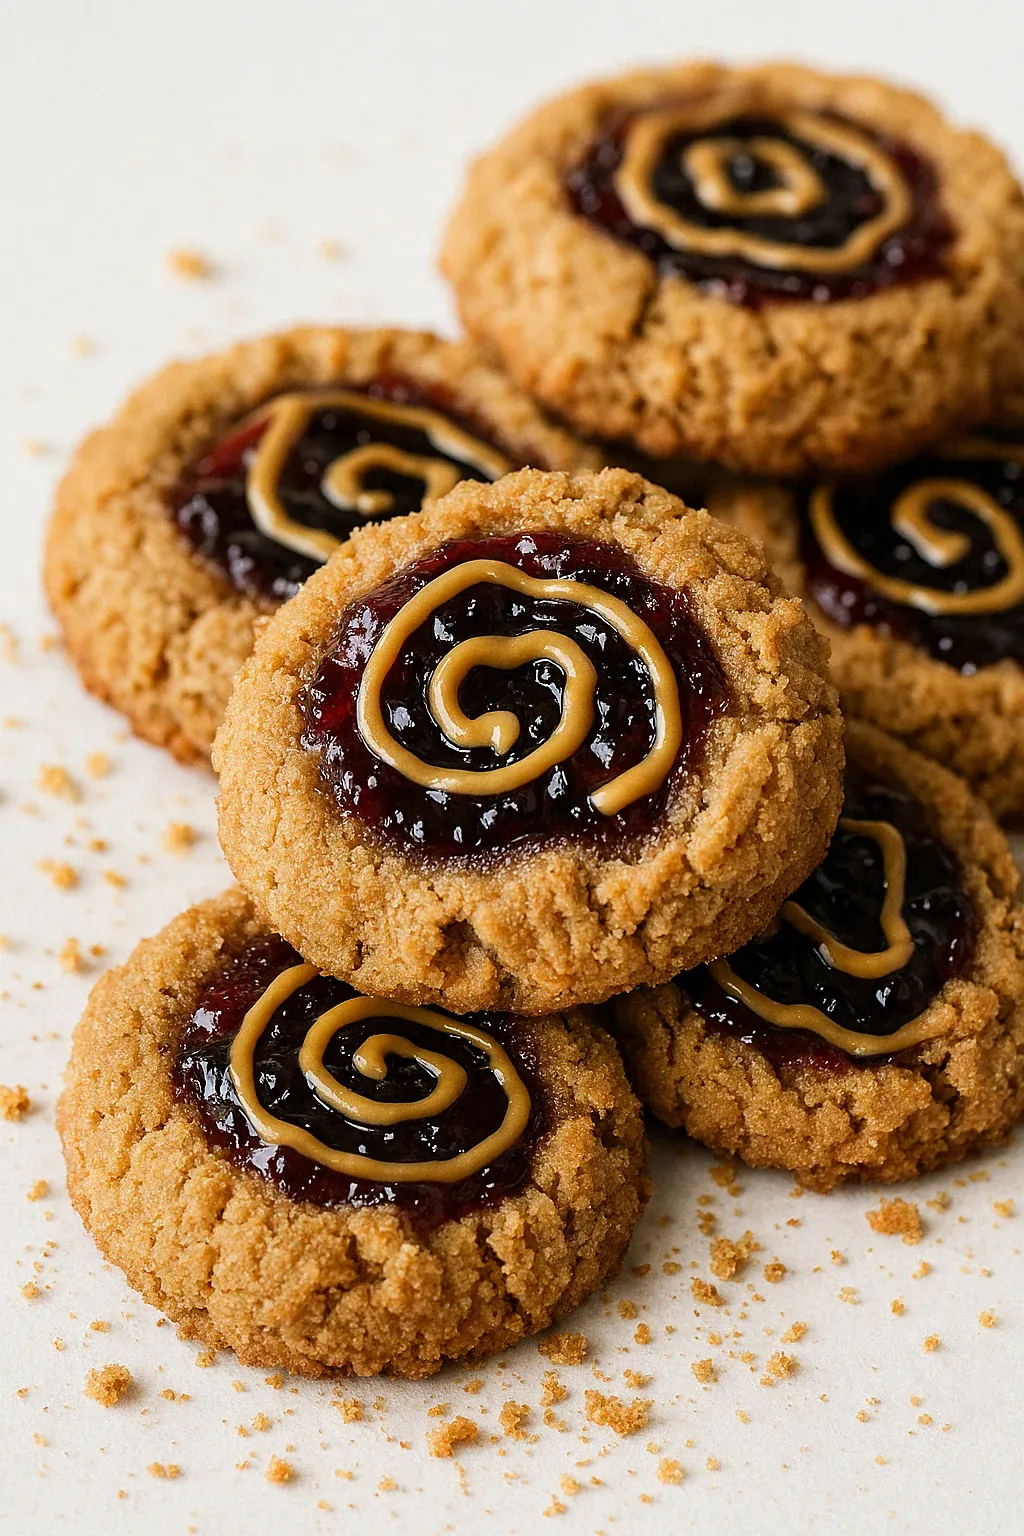
These irresistible cookies transform the beloved peanut butter and jelly sandwich into a sweet treat that delights with every bite. A soft, chewy peanut butter cookie cradles a pool of vibrant jelly, then gets drizzled with melted peanut butter for the perfect finishing touch. The combination of nutty, salty peanut butter with sweet, fruity jelly creates that nostalgic flavor we all grew up loving, but in a more sophisticated cookie form that still manages to feel like comfort food. I've brought these to countless gatherings, and they always disappear within minutes.
I stumbled upon this recipe years ago when trying to create something special for my son's lunchbox. He was going through a phase where he'd only eat peanut butter and jelly sandwiches, and I wanted to surprise him with a treat that matched his favorite flavors. The first time I packed these cookies, his lunchbox came home completely empty, and he proudly announced that he'd traded half his cookies for extra recess time with his friends. Now they're our go-to cookie when we need something reliably delicious that appeals to all ages.
Ingredients You'll Need
- 1 stick unsalted butter – Creates a rich, tender texture in the cookie base. Make sure it's at room temperature so it creams properly with the sugars. The butter should be soft enough that your finger leaves an indent when pressed, but not so soft that it appears shiny or melted. This ensures the perfect cookie texture and proper spreading during baking.
- ½ cup white granulated sugar – Provides sweetness and helps create those slightly crisp edges. White sugar promotes spreading and gives cookies their traditional crackly top. The fine crystals cut through the fat in the butter during creaming, creating tiny air pockets that contribute to the cookie's structure.
- ½ cup brown sugar – Adds depth of flavor and chewy texture. The molasses in brown sugar brings a caramel-like richness that complements the peanut butter beautifully. It also adds moisture, helping to keep these cookies soft and chewy even after they've cooled. Light or dark brown sugar works fine—dark will simply give a slightly deeper flavor.
- ¼ teaspoon salt – Enhances all the flavors and balances the sweetness. Don't skip this even when using salted peanut butter—it's essential for bringing out the complexity in both the peanut butter and the jelly. Table salt works perfectly, though fine sea salt is a nice upgrade if you have it on hand.
- 1 cup creamy peanut butter – Forms the backbone of these cookies' flavor. Look for a commercial-style peanut butter like Jif or Skippy for the most consistent results. Natural peanut butters that separate can cause the cookies to spread too much or become greasy. The emulsifiers in commercial peanut butter help create that perfect cookie texture we're looking for.
- 1 egg – Binds everything together and adds structure. A room temperature egg incorporates more easily into the cookie dough. To quickly bring a cold egg to room temperature, place it in a bowl of warm (not hot) water for about 5 minutes before using.
- 1 teaspoon vanilla extract – Adds depth and rounds out the flavors. Pure vanilla extract offers the best flavor, but imitation works in a pinch. The subtle floral notes of vanilla complement both the peanut butter and fruit flavors in these cookies.
- 1½ cups all-purpose flour – Provides structure and stability. Measuring accurately is crucial—too much flour will make dry, cakey cookies, while too little will cause excessive spreading. The best method is to spoon flour into your measuring cup and level it off with a knife rather than scooping directly with the measuring cup.
- 1 teaspoon baking soda – Creates rise and lightness in the cookies. Baking soda reacts with the acids in the brown sugar and peanut butter to create carbon dioxide bubbles, giving the cookies their perfect texture. Make sure your baking soda is fresh—it loses potency over time.
- ½ cup grape jelly – Creates the signature sweet center. While grape is classic, raspberry or strawberry jam offer delicious alternatives with different flavor profiles. Choose a smooth jelly for the most traditional look, or a chunkier jam for more texture and fruit pieces. The pectin in the jelly helps it maintain its shape during baking without running all over the cookie.
Step-by-Step Cooking Instructions
- Step 1:
- Prepare your baking environment – Preheat your oven to 350°F and line 1-2 baking sheets with parchment paper. The parchment prevents sticking and makes cleanup easier. Position your oven rack in the center position for the most even heat distribution. Having everything ready before mixing ensures you can work efficiently once the dough comes together.
- Step 2:
- Cream the butter and sugars properly – In a large mixing bowl, combine the room temperature butter, white sugar, brown sugar, and salt. Beat with an electric mixer or stand mixer on medium speed for 2-3 minutes until the mixture becomes light and fluffy. This important step incorporates air into the butter, creating tiny pockets that help the cookies rise properly. Don't rush this process—proper creaming is key to the right texture.
- Step 3:
- Add the wet ingredients – Add the peanut butter, egg, and vanilla extract to the creamed butter mixture. Whisk or beat on medium speed until everything is thoroughly combined and the mixture looks smooth and uniform. Scrape down the sides of the bowl at least once during mixing to ensure all ingredients are fully incorporated. The mixture should be creamy and somewhat thick at this stage.
- Step 4:
- Incorporate the dry ingredients carefully – Add the flour and baking soda to the wet ingredients. Switch to a rubber spatula or wooden spoon and fold the ingredients together using gentle strokes until no dry spots remain. This gentle mixing prevents overworking the gluten in the flour, which could make your cookies tough. The dough will be thick but soft and slightly sticky when properly mixed.
- Step 5:
- Shape the cookies with precision – Using a 2-inch cookie scoop or large melon baller, portion the dough into even balls. This ensures uniform size and baking time for all your cookies. Place the dough balls on your prepared baking sheets, leaving about 2 inches of space between each one to allow for spreading. The cookies will expand during baking, so proper spacing prevents them from merging together.
- Step 6:
- Create wells for the jelly – Using the back of your cookie scoop, measuring spoon, or your thumb, press an indentation into the center of each cookie dough ball. Make the depression deep enough to hold about a teaspoon of jelly, but be careful not to press all the way through to the baking sheet. If the dough sticks to your tool, lightly moisten it with water between impressions.
- Step 7:
- Fill with jelly before baking – Spoon approximately one teaspoon of jelly into each indentation you've created. The jelly should fill the well but not overflow onto the cookie dough. For the neatest appearance, use a small spoon or piping bag to add the jelly precisely. Different jelly flavors can be used if you want to create a variety of options.
- Step 8:
- Bake to perfect doneness – Place the cookie sheets in your preheated oven and bake for approximately 13 minutes. The cookies are done when the edges are set and slightly golden brown, while the centers remain soft. The jelly will be bubbling hot when you remove them from the oven. Resist the urge to overbake—these cookies continue to firm up as they cool.
- Step 9:
- Cool strategically – Allow the cookies to rest on the baking sheet for 5 minutes after removing from the oven. During this time, they'll firm up enough to be moved without breaking. Then transfer them carefully to a wire cooling rack to finish cooling completely. The jelly needs time to set back up, so patience is key here.
- Step 10:
- Add the peanut butter drizzle – Once the cookies are completely cool, prepare the peanut butter drizzle. Heat additional creamy peanut butter in the microwave for 30 seconds, then stir to check consistency. If needed, heat in additional 10-second increments until it reaches a smooth, pourable consistency. Transfer the melted peanut butter to a piping bag or zip-top bag with a small corner snipped off. Drizzle decoratively over the jelly centers of each cookie to create an attractive finish.
 Pin it
Perfect for Lunchbox Surprises
These cookies have become my secret weapon for brightening school days. I'll sometimes make a double batch on Sunday evening, then tuck them into lunchboxes throughout the week. Nothing says "I'm thinking of you" quite like finding a homemade cookie nestled beside your sandwich. My daughter once told me that having one of these cookies in her lunch made even her toughest math test days better, which is exactly the kind of magic comfort food should work.
Cookie Exchange Champion
The first year I brought these to our neighborhood cookie exchange, I was slightly worried they'd be overlooked among more elaborate options. To my surprise, they were the first cookies to disappear from the sharing table. Three different neighbors asked for the recipe before the night was over, and now they've become a fixture at our annual gathering. There's something about the familiar flavors presented in cookie form that simply delights people of all ages.
Make-Ahead and Freezer Friendly
One of my favorite things about this recipe is how well it works for advance preparation. The cookie dough can be made and shaped up to 24 hours ahead, stored covered in the refrigerator until you're ready to add the jelly and bake. I've also found that the baked cookies freeze beautifully for up to three months—just place them in a single layer until frozen solid, then transfer to a container with parchment between layers. Thaw at room temperature when you're ready to enjoy them.
Creative Variations
While the classic grape jelly version holds a special place in my heart, these cookies welcome experimentation. During summer berry season, I make them with homemade blackberry jam for a more sophisticated flavor profile. Around the holidays, apple jelly with a touch of cinnamon in the cookie dough creates a festive twist. For adult gatherings, I've even used hot pepper jelly for a surprising sweet-heat combination that pairs beautifully with after-dinner drinks.
The Perfect Milk-Dunking Cookie
Something magical happens when these cookies meet a cold glass of milk. The crisp edges soften slightly, while the peanut butter flavor intensifies in the most delightful way. It's a simple pleasure that never fails to transport me back to childhood afternoons at my grandmother's kitchen table. For an extra special treat, try them with chocolate milk—the combination of chocolate, peanut butter, and fruit jam creates an incredible flavor trifecta.
My grandmother taught me a valuable lesson about these cookies after I once rushed the process and ended up with cracked, messy results. "Patience makes perfect peanut butter cookies," she told me as we started over. She explained that allowing the proper time for each step—from room temperature ingredients to adequate cooling—was the secret to bakery-quality results. Now I consider making these cookies a mindfulness exercise, an opportunity to slow down and enjoy the process as much as the result.
 Pin it
I discovered the cinnamon trick completely by accident one fall day when I was making these cookies while also preparing apple pie. A bit of cinnamon from my hands must have transferred to the cookie dough, and the resulting batch had this wonderful subtle warmth that everyone commented on. Now it's my secret ingredient, especially during the cooler months when we crave those cozy baking spices.
These Peanut Butter and Jelly Cookies capture everything we love about the classic sandwich but transform it into something special enough for company. There's a unique joy in watching someone bite into one for the first time—that moment of recognition as the familiar flavors register, followed by surprise at experiencing them in cookie form. It's comfort food reinvented, bringing together the simplicity we cherish from childhood with the satisfaction of homemade baking at its best.
Frequently Asked Questions
- → Can I use crunchy peanut butter instead of creamy?
- Yes, you can substitute crunchy peanut butter for a bit of texture in your cookies. The dough will have small peanut pieces throughout, which many people enjoy. Just make sure it's a standard peanut butter, not a natural one that separates, for best results.
- → What's the best way to create the well in the center of the cookies?
- While the recipe suggests using the back of a cookie scoop, you can also use your thumb (hence 'thumbprint cookies'), the back of a rounded measuring spoon, or the bottom of a shot glass. Press gently to create a depression without cracking the edges too much.
- → Can I make these cookies ahead of time for a party?
- Absolutely! These cookies can be made 2-3 days ahead and stored in an airtight container with parchment between layers. You can also freeze the baked cookies for up to 3 months, or freeze the shaped dough (before adding jam) and bake fresh when needed.
- → Why did my jelly sink into the cookie while baking?
- This can happen if the well isn't deep enough or if too much jelly was added. Make sure to create a substantial depression in each cookie and use about a teaspoon of jelly - not more. The jelly will bubble slightly during baking but should mostly stay contained.
- → Can I make these cookies without the peanut butter swirl on top?
- Yes, the peanut butter swirl on top is decorative and can be omitted. The cookies will still have that classic PB&J flavor from the cookie base and jelly center. You could also substitute a simple powdered sugar glaze if you want a decorative element without the extra peanut butter.