
 Pin it
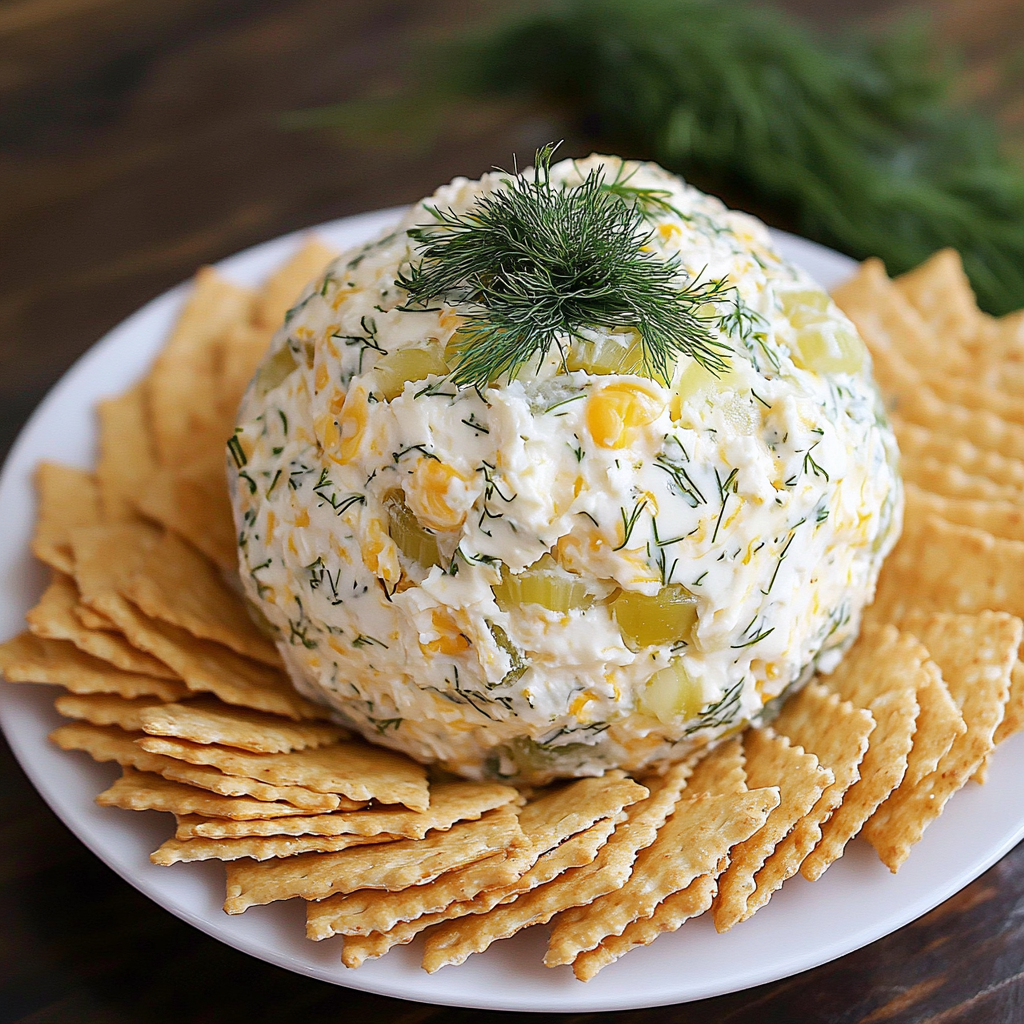
Tangy dill pickle flavor meets rich cream cheese in this spectacular appetizer that will steal the spotlight at any gathering. The Dill Pickle Cheese Ball transforms simple ingredients into an impressive centerpiece that will have guests coming back for "just one more bite" all evening long. The combination of sharp cheddar, zesty pickles, and fresh herbs creates a perfect balance of flavors that spread beautifully on your favorite crackers or crusty bread.
I first served this cheese ball at a last-minute backyard barbecue when I needed something impressive with ingredients already in my refrigerator. The pickle lovers descended upon it immediately, and even those who claimed they weren't "pickle people" couldn't resist coming back for seconds. My brother-in-law now specifically requests this appetizer whenever he visits, calling ahead to make sure it will be waiting when he arrives.
Ingredients You'll Need
- 8 oz cream cheese, softened – Full-fat works best for the richest texture; bring to room temperature for easier mixing and a lighter, fluffier result
- 1/4 cup sour cream – Adds tanginess and creates a more spreadable consistency; choose full-fat for the best flavor and texture
- 1/2 teaspoon garlic powder – Provides a subtle savory note that balances the richness; fresh garlic can be too harsh and may overpower
- 1 tablespoon fresh lemon juice – Brightens all the flavors; use freshly squeezed for the cleanest taste with no artificial aftertaste
- 1/4 teaspoon salt and pepper – Season carefully as pickles and cheese already contain salt; taste before forming the ball
- 1 cup shredded cheddar cheese, divided – Sharp or extra-sharp provides the best contrast to the tangy pickles; grate your own for superior melting
- 3/4 cup finely chopped dill pickles – Drain and pat dry thoroughly to prevent excess moisture; choose crisp, refrigerated pickles rather than shelf-stable for better texture
- 2 tablespoons fresh dill, chopped, plus more for coating – The delicate anise flavor of fresh dill elevates the entire dish; dried simply won't provide the same brightness
Step-by-Step Instructions
- Step 1:
- Prepare Your Workspace – Before beginning, ensure your cream cheese has softened completely at room temperature for at least one hour. Cold cream cheese will result in lumps and make incorporation of other ingredients difficult. Set out all ingredients measured and ready to go, with extra paper towels nearby for draining the pickles thoroughly. Creating a comfortable, organized workspace will make the assembly much more enjoyable.
- Step 2:
- Create the Creamy Base – In a large mixing bowl, combine the softened cream cheese, sour cream, garlic powder, fresh lemon juice, salt, and pepper. Using a hand mixer on medium speed, beat these ingredients together for a full two minutes, scraping down the sides of the bowl halfway through. This extended mixing time incorporates air into the mixture, creating that light, fluffy texture that makes the cheese ball irresistibly spreadable. The mixture should be completely smooth with no lumps remaining.
- Step 3:
- Incorporate the Flavor Elements – Once your base is perfectly smooth, switch to a sturdy wooden spoon or silicone spatula. Fold in half of the shredded cheddar cheese (1/2 cup), taking care not to overmix which would make the mixture dense. Next, add the finely chopped dill pickles, ensuring they've been thoroughly drained and patted dry with paper towels – excess moisture is the enemy of a perfect cheese ball. Finally, gently fold in the fresh chopped dill until evenly distributed throughout the mixture. The vibrant green flecks should be visible throughout the creamy base.
- Step 4:
- Shape with Precision – Lay two long pieces of plastic wrap in a crisscross pattern on your countertop, creating an "X" that will give you enough material to completely encase the cheese mixture. Spoon the cream cheese mixture into the center of the plastic wrap, then gather all four ends of the plastic wrap together above the mixture. Twist the gathered plastic wrap tightly, using your hands to shape the mixture into a ball as you twist. Continue twisting and shaping until you have a firm, well-formed ball completely enclosed in plastic wrap. Tie or secure the twisted end with a small rubber band if needed.
- Step 5:
- Chill Thoroughly – Place the wrapped cheese ball in the refrigerator on a small plate to maintain its shape. Chill for at least two hours, though overnight is preferable as it allows the flavors to meld completely. The extended chilling time not only helps the ball hold its shape but significantly improves the flavor as the pickle and herb notes infuse throughout the cheese mixture. This is one case where patience truly pays off in the final result.
- Step 6:
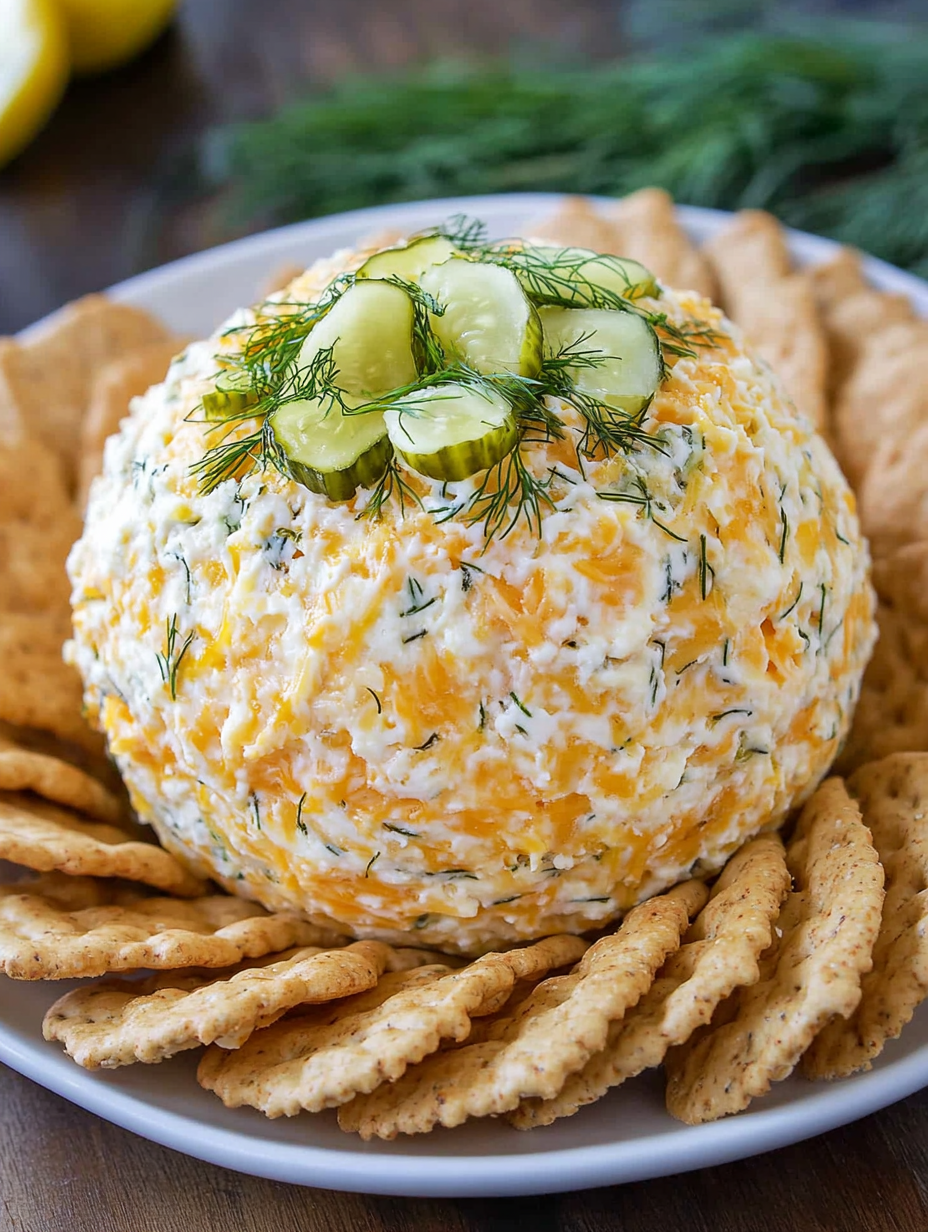
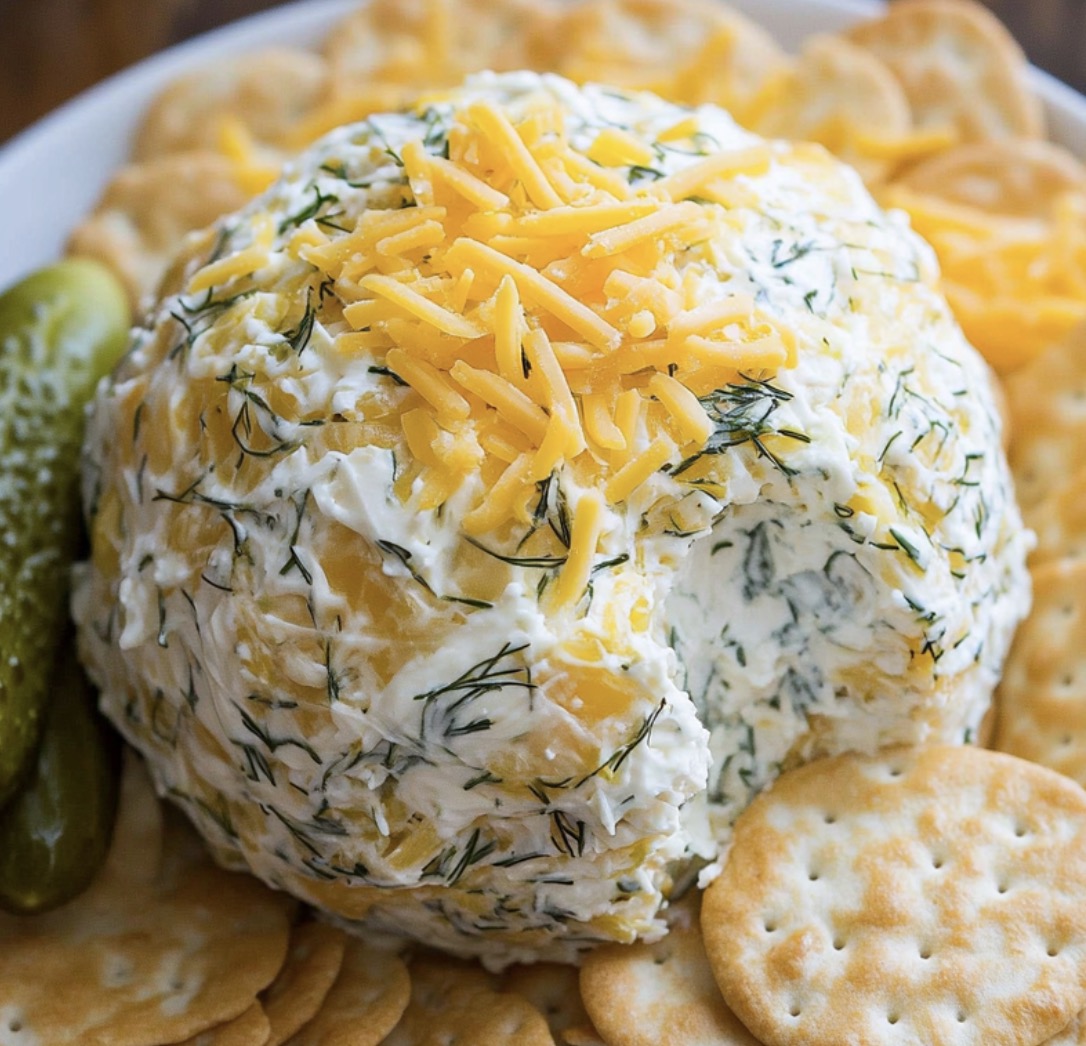
- Prepare the Festive Coating – About 15 minutes before you're ready to serve, combine the remaining 1/2 cup of shredded cheddar cheese, 2 tablespoons of fresh chopped dill, and 1 teaspoon of lemon zest on a flat plate or shallow bowl, mixing them together to create an even blend. This vibrant coating not only adds beautiful color and texture but provides an immediate flavor preview of what's inside. The lemon zest in particular adds bright, aromatic notes that elevate the entire presentation.
- Step 7:
- Apply the Coating – Remove the chilled cheese ball from the refrigerator and carefully unwrap it, taking care to maintain its round shape. Immediately roll the cheese ball in the prepared coating mixture, using your hands to gently press the coating ingredients onto any bare spots. Work quickly but carefully, as the cheese ball will begin to soften at room temperature. Rotate the ball to ensure even coverage on all sides, creating a beautiful, textured exterior that hints at the flavors inside.
- Step 8:
- Present with Flair – Transfer your completed cheese ball to a serving platter, preferably one with enough space around it to later add crackers and serving utensils. For an extra decorative touch, place a small sprig of fresh dill on top of the cheese ball as a garnish. If not serving immediately, you can return it to the refrigerator uncovered for up to an hour. Any longer and you'll want to loosely cover it with plastic wrap to prevent the exterior from drying out.
 Pin it
Our family beach trips always include a cooler of homemade snacks for afternoon grazing. This pickle cheese ball has become our tradition for the first evening, signaling the official start of vacation. I particularly love adding a teaspoon of pickle brine to the mixture for extra tanginess – a trick my grandmother taught me when making her famous pickle sandwiches that kept us fueled during long summer days.
Serving Suggestions
The versatility of this Dill Pickle Cheese Ball extends far beyond just crackers. Consider offering an array of dipping vehicles such as pretzel sticks, cucumber rounds, or even warm pita triangles. The contrast between the cool, creamy cheese and warm bread creates a delightful sensory experience. For pickle enthusiasts, include gherkins or pickle spears alongside the platter to emphasize the theme and provide textural contrast to the spread.
Creative Variations
While the classic dill pickle version holds a special place in my appetizer repertoire, experimenting with variations has produced some memorable alternatives. Substituting half the dill pickles with spicy jalapeño pickles creates a version with gentle heat that pairs wonderfully with Mexican-inspired meals. For a sophisticated twist, adding 2 tablespoons of finely minced capers and replacing the cheddar with crumbled feta transforms this into a Mediterranean-inspired spread that complements olives and roasted red peppers beautifully.
Make-Ahead Magic
The beauty of cheese balls lies in their make-ahead convenience, making them perfect for busy hosts. The flavor actually improves after 24 hours as the ingredients meld together, creating a more cohesive taste profile. To plan ahead for an event, make the cheese mixture up to three days before, form the ball and wrap tightly, then apply the coating just before guests arrive. This approach ensures maximum flavor development while maintaining the fresh appearance of the herbs in the coating.
Texture Secrets
The perfect cheese ball strikes a delicate balance between spreadable and structured. Too firm and it becomes difficult to spread; too soft and it loses its impressive shape. The inclusion of sour cream in this recipe creates that ideal middle ground, while the brief mixing time incorporates just enough air for lightness without becoming runny. Remember that the mixture will firm considerably during refrigeration, so don't worry if it seems slightly soft when first mixed.
Perfect Pairings
This pickle-infused creation pairs wonderfully with beverages that can stand up to its bold flavor profile. Consider serving alongside a crisp Pilsner beer, whose light hoppy notes complement the dill beautifully. For wine lovers, a bright Sauvignon Blanc offers enough acidity to cut through the richness while enhancing the herbal qualities. Non-alcoholic options include cucumber-infused sparkling water or a tangy lemonade that echoes the citrus notes in the cheese ball.
 Pin it
My journey with this recipe began at a summer potluck where a friend brought a basic cheese ball that disappeared within minutes. Determined to create something equally crowd-pleasing but with more distinctive flavor, I experimented with my family's love of all things pickled. After several iterations, this version emerged as the clear winner – the perfect balance of creamy, tangy, and savory elements that keeps guests hovering near the appetizer table throughout the evening. Whether served at holiday gatherings or casual game days, this Dill Pickle Cheese Ball creates a moment of shared enjoyment that turns any occasion into something special.
Frequently Asked Questions
- → Can I make this cheese ball ahead of time?
- Yes! This cheese ball can be made up to 3 days ahead. Prepare the ball and refrigerate it wrapped in plastic wrap, but wait to add the outer coating until a few hours before serving.
- → What kind of pickles work best for this recipe?
- Dill pickles are traditional for this recipe, but you could use kosher dills or Polish dills. Avoid sweet pickles as they would significantly change the flavor profile.
- → What can I serve with this cheese ball?
- This cheese ball pairs perfectly with buttery crackers, pretzel thins, bagel chips, or even sliced vegetables like carrots and celery for a lower-carb option.
- → Can I use dried dill instead of fresh?
- Yes, though fresh dill provides the best flavor. If using dried dill, use about 1/3 the amount (so about 2 teaspoons in the mixture and 1 teaspoon in the coating).
- → How should I store leftover cheese ball?
- Wrap any leftover cheese ball tightly in plastic wrap and refrigerate for up to 5 days. The texture may soften slightly but the flavor will remain delicious.