
 Pin it
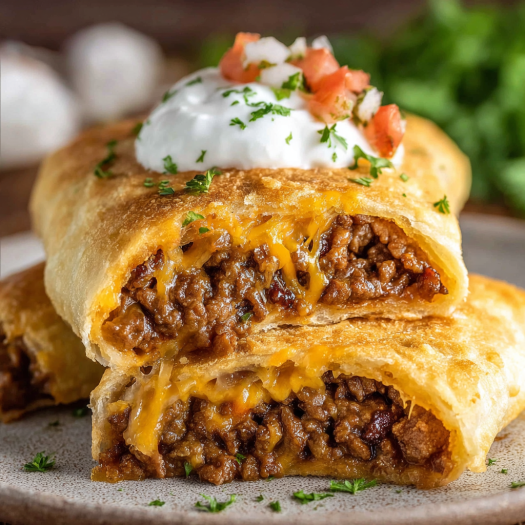
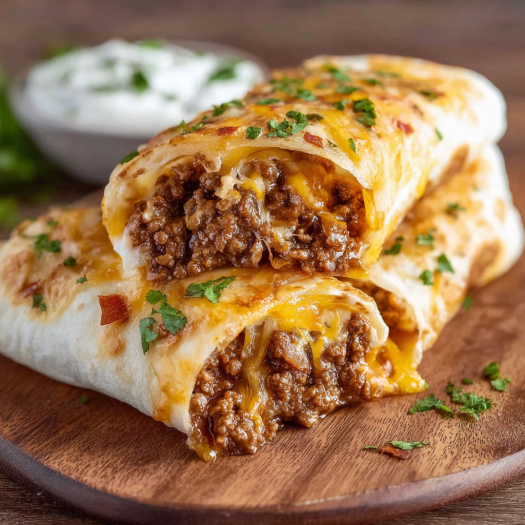
If ooey gooey cheese pulls and comforting handheld bites make you smile, this Beef Meximelt Cheesy Taco delivers that joy in every mouthful. Think cheesy taco filling hugged by buttery, garlicky dough, finished with a shower of Parmesan—these are the ultimate party bombs that fly off the tray at gatherings in my house. They combine the nostalgic flavors of a fast-food Meximelt with a rich, buttery twist.
The first time I set these out for a game night, every single one disappeared before halftime. Now my family asks for them whenever we host friends because they’re just that irresistible.
Ingredients
- Ground beef: for a rich savory filling with classic taco vibes. Choose 80 to 85 percent lean for the right blend of juiciness and flavor
- Salt, pepper, garlic powder, and onion powder: these bring layers of seasoned depth. Freshly cracked pepper and real garlic add more punch
- Worcestershire sauce: a spoonful lifts the beefy flavor and adds umami. Look for a brand with minimal sugar for best results
- Shredded cheddar or mozzarella cheese: that signature gooeyness. Shred your own from a block for superior melt
- Optional crispy bacon, pickles, caramelized onions: for added texture and layers of flavor
- Refrigerated biscuit or pizza dough: easy shortcut dough gives a pillowy wrap. Pizza dough gives a chewier bite while biscuit dough is more tender
- Butter, melted: coats the tops for buttery richness. Use real butter for the best golden crunch
- Minced garlic or garlic powder: infuses the butter with warm savory aroma and makes the topping unforgettable
- Parmesan cheese: freshly grated for best melt and nutty flavor. Skip the stuff in the green can
- Chopped fresh parsley (optional): for color and a little garden freshness
Instructions
- Prepare the Filling:
- Cook your ground beef over medium heat in a large skillet until it is deep golden and no longer pink. Drain off any excess fat. Season generously with salt, pepper, garlic powder, and onion powder, then add Worcestershire sauce. Allow this mixture to cool fully so your cheese does not melt too early. Once cooled, stir in the shredded cheese so it clings to every bite.
- Shape and Fill:
- Flatten each piece of your refrigerated dough into a circle about four inches wide. Place one to two tablespoons of the cooled beef and cheese filling right in the center. Carefully pull up the sides and pinch to tightly seal the filling inside. Gently roll into a smooth ball to enclose the goodness.
- Arrange and Top:
- Transfer your filled dough balls seam side down onto a parchment lined baking sheet, leaving space between them so they do not touch. Mix the melted butter with minced garlic, then brush each dough bomb generously. Sprinkle grated Parmesan cheese over each one.
- Bake:
- Heat your oven to 375 degrees Fahrenheit. Bake the dough bombs for about fifteen to eighteen minutes or until the tops are richly golden and the dough springs back to the touch.
- Finish and Serve:
- Immediately brush the hot bombs with any extra garlic butter and add chopped parsley if you are using it. Serve them warm as soon as they are cool enough to handle with your favorite dip like ranch, garlic aioli, or spicy mayo.
 Pin it
For me the best part is watching everyone’s reaction when they break open that golden crust and see the molten cheese. The way the aroma of garlic butter fills the kitchen reminds me of my grandma’s favorite trick—always brushing hot bread with butter for a bakery fresh finish.
Storage Tips
Let your bombs cool completely before storing them for leftovers. You can keep them in the fridge for up to three days in an airtight container. For longer storage freeze them on a baking sheet then bag and store in the freezer for up to two months. To reheat pop them into a 350 degree Fahrenheit oven or air fryer for around eight minutes until crispy and hot throughout.
Ingredient Substitutions
Ground turkey or chicken work as lean alternatives to ground beef. For the dough both homemade and store bought options are fine. If you want a richer taste add more sharp cheddar or even pepper jack for extra heat. Leave out beef and use sauteed mushrooms and black beans for a vegetarian twist.
Serving Suggestions
These are great with creamy dips like ranch, sour cream, or even queso for extra indulgence. For a party platter I like to serve them with sliced jalapenos, chopped cilantro, and a wedge of lime for squeezing over the top. You can even make a breakfast variation by swapping in scrambled eggs and breakfast sausage.
Cultural and Historical Context
The Meximelt was a beloved menu item at Taco Bell that inspired this recipe. It combined cheesy beef with a warm tortilla—a fusion of Tex Mex comfort. Wrapping that classic filling in a buttery dough bomb brings the idea home but takes it to a new level of party food perfection. Gathering friends for game day and making a big batch feels like a modern American tradition in my kitchen.
 Pin it
This recipe is a guaranteed hit and easily adapts to whatever is in your fridge. You will want to make a double batch—trust me.
Frequently Asked Questions
- → How do I keep the filling from leaking out?
Ensure the filling is completely cooled before assembling and tightly pinch the dough edges to seal.
- → Can I prepare these in advance?
Yes, assemble the dough bombs ahead and bake later. Baking fresh ensures the best texture and flavor.
- → What are the best cheeses to use?
Cheddar or mozzarella work well, but you can use any melty cheese for extra flavor.
- → How do I reheat leftovers?
Leftovers can be reheated in the oven or air fryer to restore crispiness without drying them out.
- → What dipping sauces go well with these?
Try ranch, spicy mayo, or garlic aioli to complement the savory, cheesy filling.
- → Can I add other fillings?
Definitely! Add jalapeños for heat, or swap beef for sausage or even scramble eggs for a breakfast version.